
Settings
Configure your Meetric account, manage team members, set preferences and control security and privacy settings.
Account Settings#
Manage your organization's Meetric account and workspace configuration.
General Settings#
Account and Company Names
Account and company profile names used across workspace and customer-facing surfaces
Example: Acme Corporation
Contact and Address Details
Main contact, phone, city/state/postcode and company registration/VAT details
Example: Main contact + registered company details
Regional Defaults
Timezone, currency, account language, content language and force-account-language policy
Example: America/New_York (EST)
Internal Participant Domains
Domain whitelist used for internal/external participant classification in notetaker behavior
Example: acme.com
Profile Settings (Personal Information)#
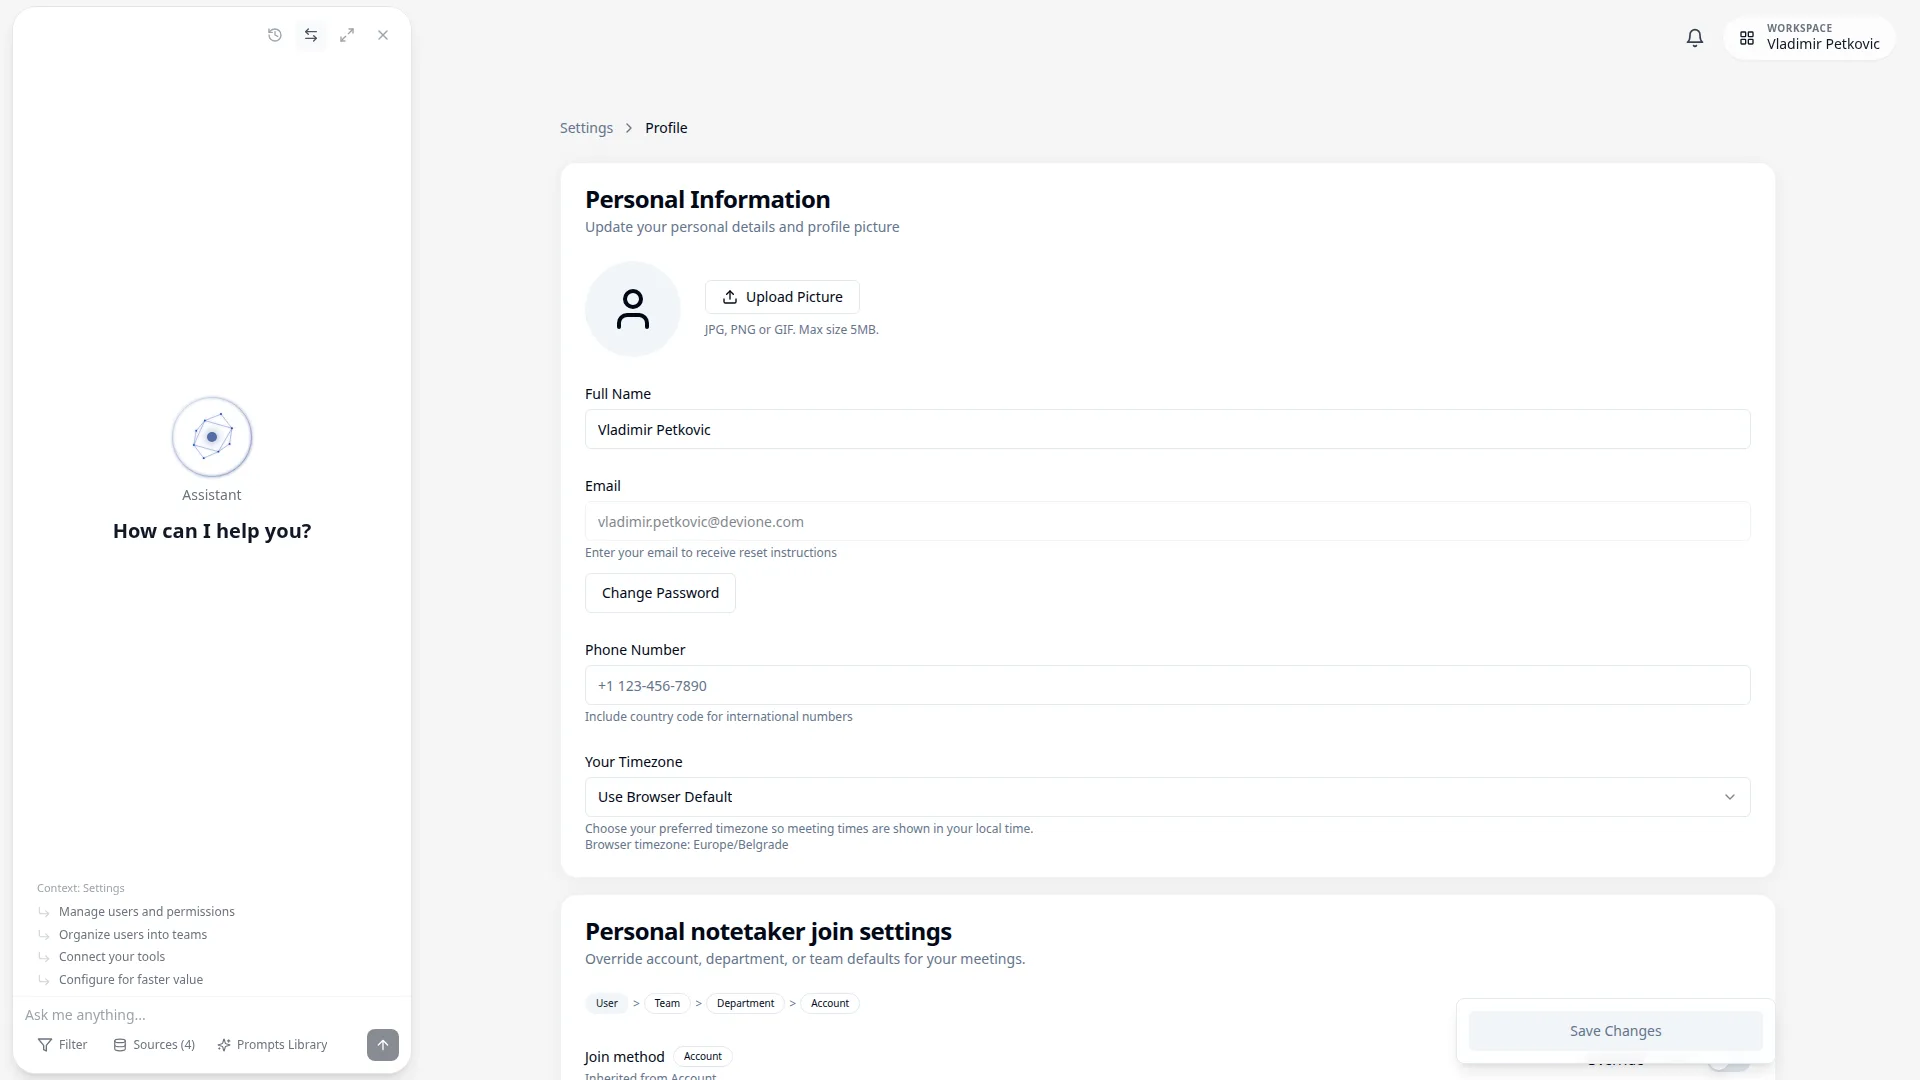
Use Settings → Profile to manage your personal account information used across Meetric.
- Profile picture: Upload or replace your avatar image
- Identity fields: Update first name, last name, email, phone number
- Timezone: Set a personal timezone, or inherit from team, department, then company timezone.
- Password: Use Change Password to start password reset/update flow
- Save changes: Click Save Changes to persist profile updates
Workspace Access & Structure#
Manage users, roles, teams, departments and scoped managers from Settings.
User Management (Settings → Users)#
Use the Users page for account-level access management and profile updates.
- Open Settings → Users
- Click Add User to open the Add New User modal
- Fill required fields in the modal: Email, Full Name, Role and Team (required); Department is optional
- Click Create User to save the user
- Manage user rows using the Actions menu: Edit, Integration metadata, Reset Password and Archive
- Use table columns (Name, Email, Department, Team, Role, Status, Licenses, Integrations, Last Login) to audit account access state
Controls in this area#
Primary and destructive controls on User Management. Cancel and Close are omitted.
Team Management (Settings → Teams)#
Teams define the primary collaboration structure for users and reporting views.
- Create Team: Click Create Team to open the Create New Team modal
- Define ownership: Set team details in the creation modal before saving
- Add Members: Add users to a team and keep one primary team assignment per user
- Timezone override: Optionally override department and account timezone for this team.
- Row actions: Open Actions for Edit Team, Add Member, Managers and Remove
- Cleanup: Use Remove when that action is available for your access level
Controls in this area#
Primary and destructive controls on Team Management. Cancel and Close are omitted.
Department Management (Settings → Departments)#
Departments organize conversations, analytics and automations at a higher business level.
- System Departments: Enable or disable built-in departments per account
- Custom Departments: Click Add Custom Department to open Create Custom Department
- Naming: Define department naming in the creation modal
- Timezone override: Optionally override the account timezone for this department.
- Row actions: Open Actions for Edit, Managers and status toggle (Disable/Activate)
- Removal: Remove appears for removable custom departments
Controls in this area#
Primary, mode-changing and destructive controls on Department Management. Cancel and Close are omitted.
Conversation Types (Organization Workflow)#
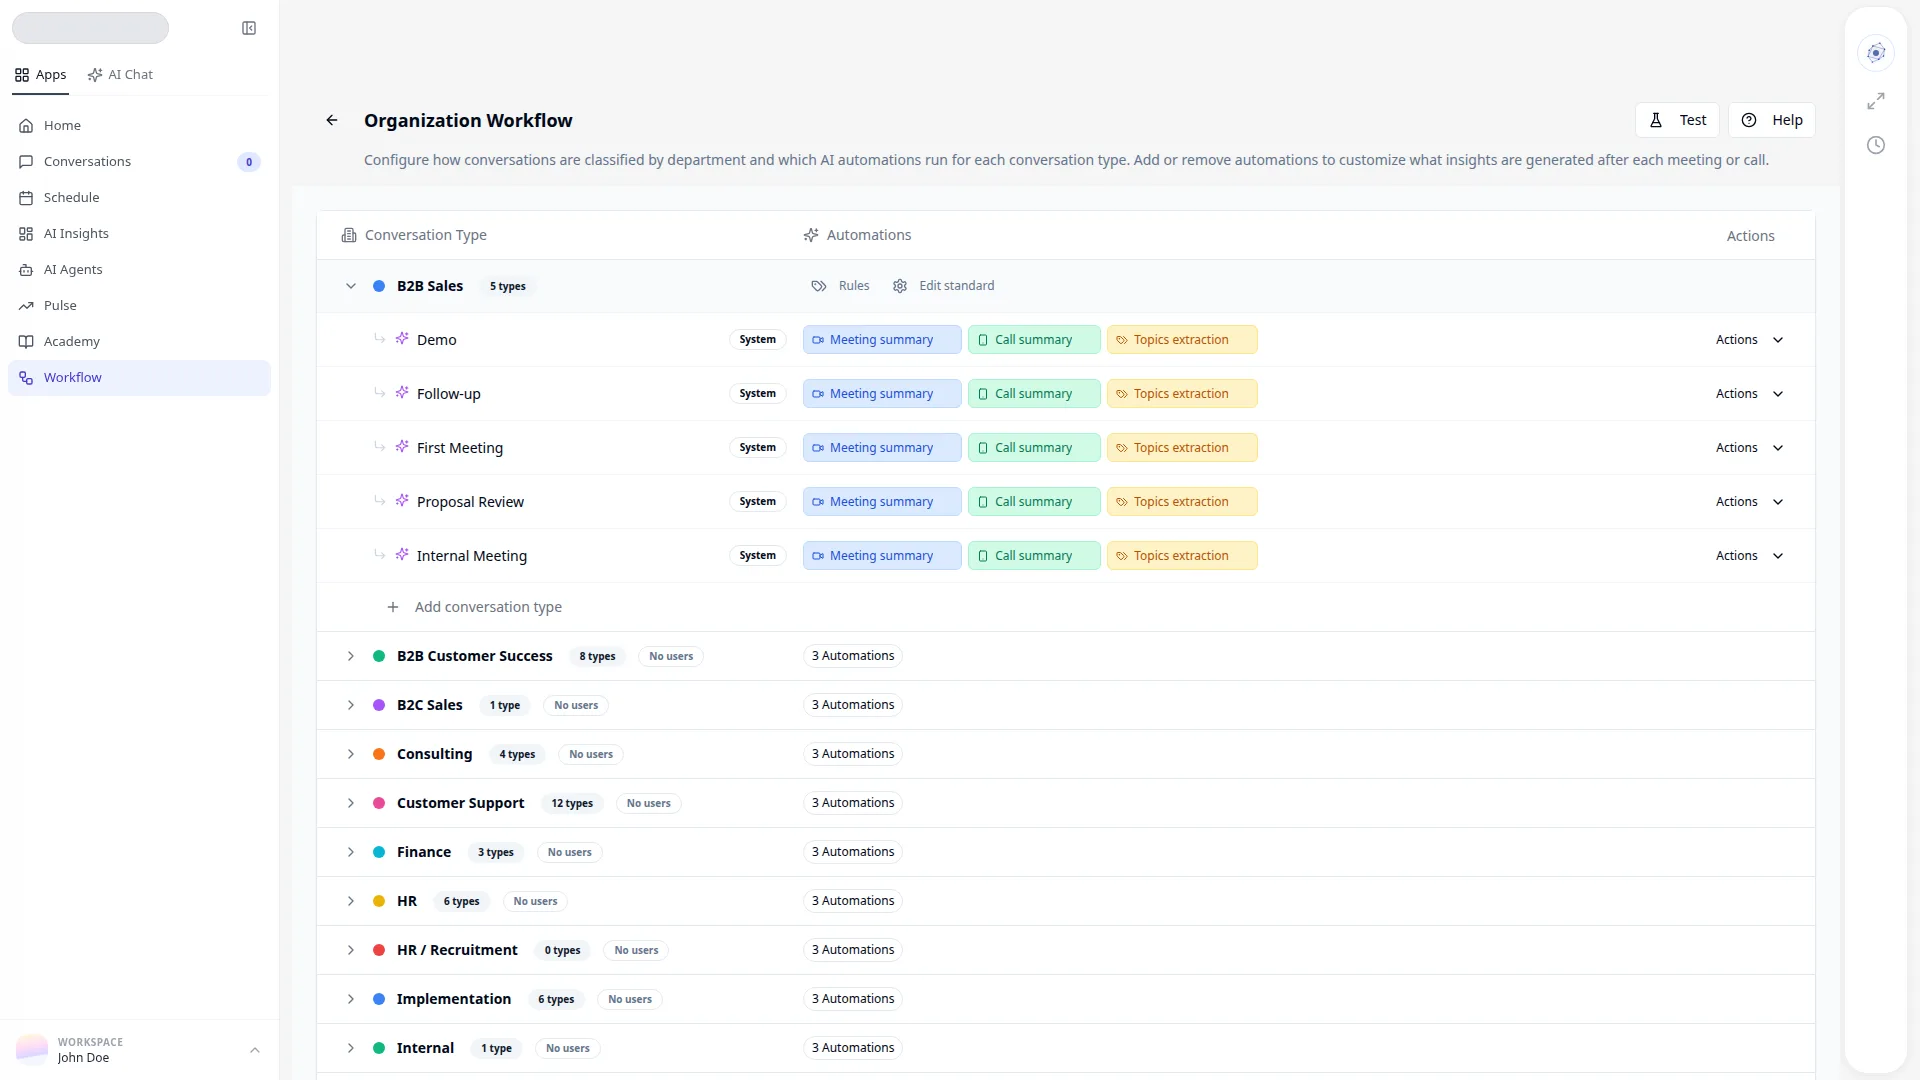
Conversation Types classify conversations (for example Discovery Call or Renewal) so matching, filters, summaries and AI Agents can target the right meetings. Admins create and edit types in Organization Workflow; users assign or change them when capturing or reviewing conversations.
How to create a Conversation Type
- Open Organization Workflow.
- Expand the department where the type should live, then click Add conversation type.
- Enter a Name. The department is prefilled from the row and cannot be changed in the create modal.
- Review Allowed Communication Mediums (Phone Call, Video Meeting, In-Person). All are selected by default.
- Optionally configure the Matching Sequence: CRM Type → Title/Description → AI Categorization. Matching stops at the first successful step. Every step is optional.
- If you type keywords, CRM names or AI rules into a chip field, press Enter or click + to confirm each value before saving.
- Click Create.
System vs custom types
- System types: Built-in presets (for example Internal Meeting). Rules are read-only; you can enable or disable them for classification on your account.
- Custom types: Account-owned types you create. You can edit matching rules, mediums, enable/disable classification and delete them when unused.
After you create a type
Attach automations from the type row in Organization Workflow, or update department defaults with Edit standard. See Workflow Scope & Department Standards and Edit Standard: Department Defaults & Overrides.
Scoped Manager Model#
Meetric separates account governance from scoped management responsibilities:
- Account role: Defines baseline administrative authority ( `member`, `manager`, `admin`, `owner`).
- Team managers: Explicit assignments for specific teams.
- Department managers: Explicit assignments for specific departments.
User Preferences#
Personal profile and account preferences that affect your own experience.
Personal Settings#
Personal profile
- • First name, last name, and avatar
- • Email and phone number
- • Personal timezone
Account access preferences
- • Password reset/change flow
- • Role and team access as assigned by admins
- • Department assignment visibility in user records
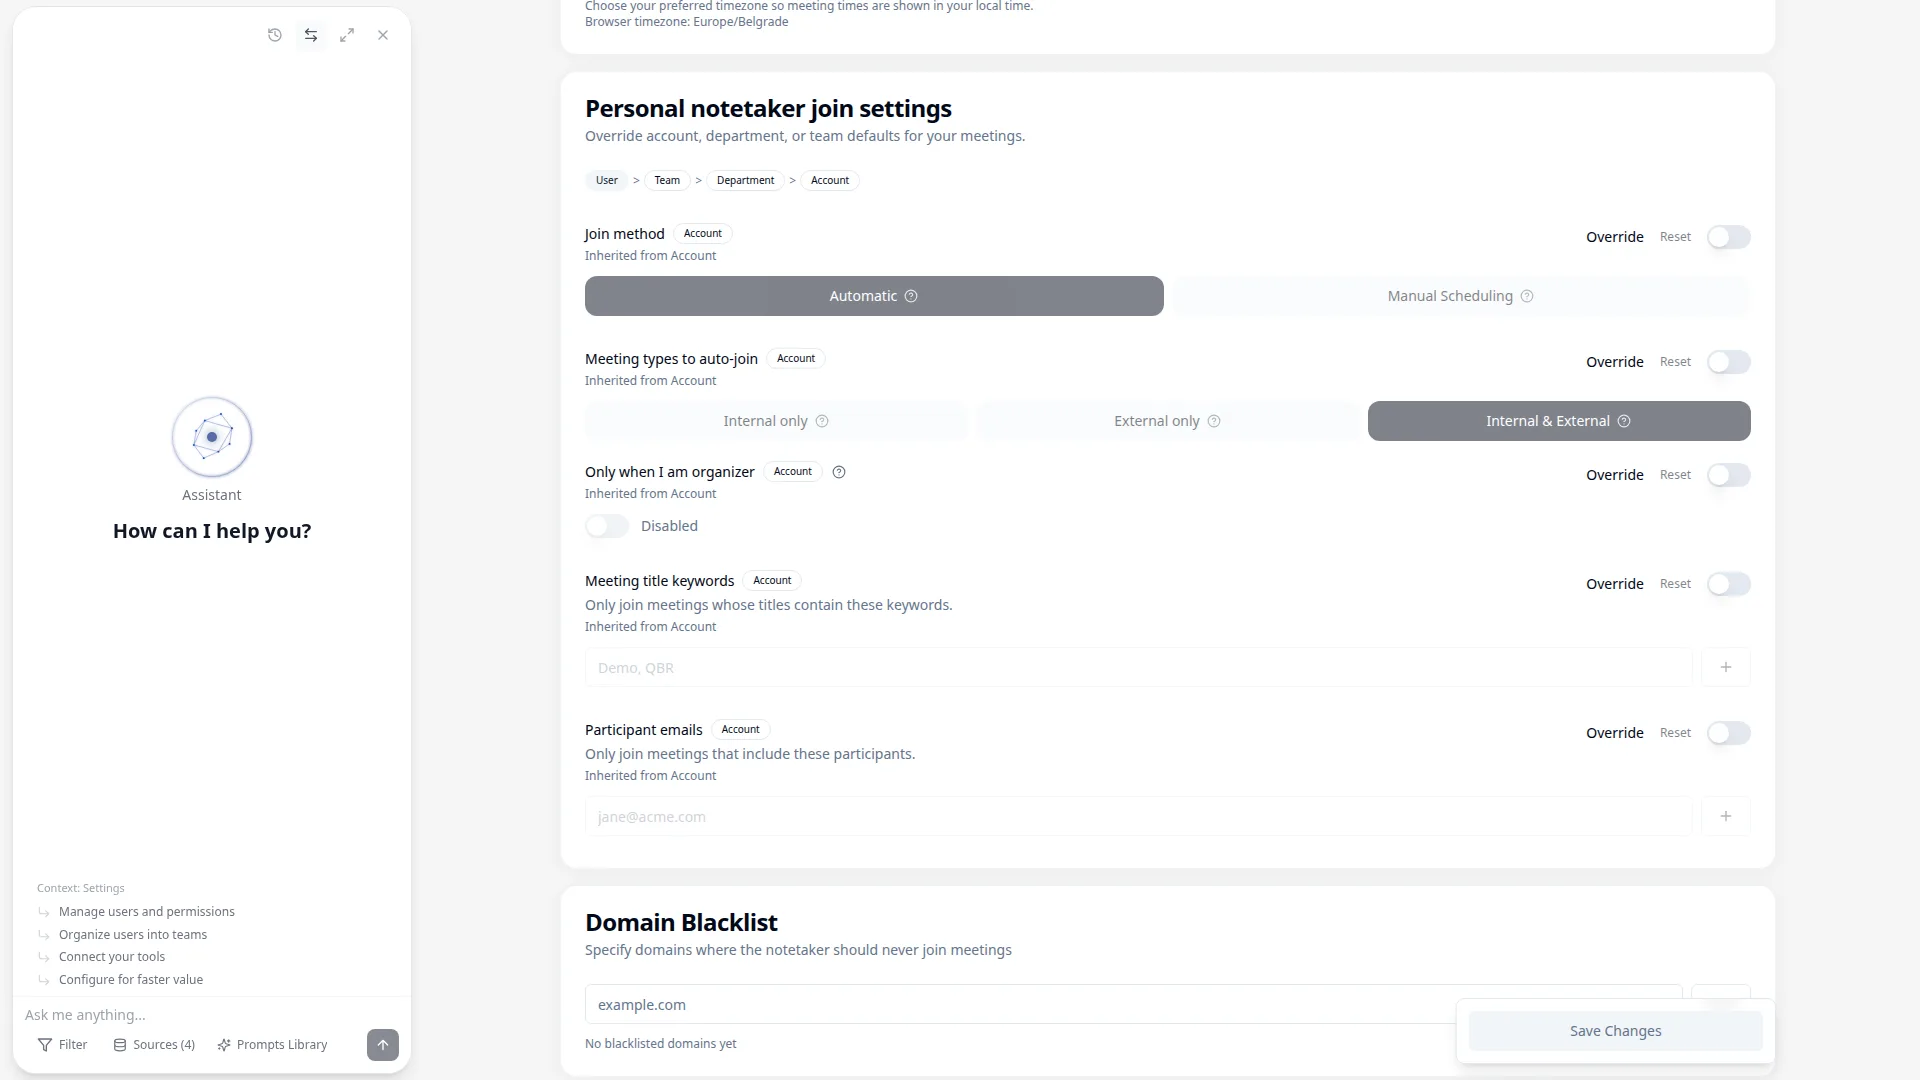
- • Personal notetaker join settings override
- • Domain blacklist for meetings the notetaker should never join
Save behavior
- • Review profile edits before saving
- • Use Save Changes to persist profile updates
- • Changes apply to your account profile only
Common Keyboard Shortcuts#
Meetric includes common keyboard shortcuts for faster navigation:
These shortcuts are currently fixed defaults in the app (not user-customizable from Settings). Some key behavior can vary by browser and OS.
Security & Privacy#
Protect your account and control how your data is used and stored.
Authentication & Password#
Keep your account secure with strong authentication and policy controls:
- Change Password: Start password reset/update from your profile
- MFA policy: Configure enforcement at account, department and user override levels
- Self-serve MFA reset: Reset your own MFA factors when recovery is needed
- Retention controls: Set retention policies for recordings, transcripts and stored data
✓ Minimum 8 characters
✓ At least one uppercase letter
✓ At least one number
✓ At least one special character
✓ Not a commonly used password
✓ Different from previous 5 passwords
Setting Up Two-Factor Authentication#
In the current Security UI, this section is used to configure MFA enforcement policy.
- Go to Settings → Security
- Set account-level MFA enforcement (Off, Admins and owners or All users)
- Add department overrides when a specific department needs stricter or different enforcement
- Add user-level overrides for exception handling on individual users
- Use reset actions when you need to clear an override and return to inherited policy behavior
Data Privacy Controls#
Privacy-related controls in Settings are currently exposed through specific pages:
- Retention policies: Configure recording, transcript and data retention periods in Settings → Security (Retention section).
- Legal policy links and notices: Manage Terms of Service, Privacy Policy, Data Processing Agreement and recording disclaimer content in Settings → Legal.
- Conversation privacy rules: Configure account defaults, department/team overrides and invited viewers in Settings → Conversation Privacy for eligible roles.
Licensing & Upgrades#
Manage package entitlements, seat capacity and upgrade paths from the Licensing page.
Licensing Overview#
Use Settings → Licensing to review your current contract and package state:
- Contracts and packages: Review active package/catalog entries and included products.
- Seat usage: Track assigned versus available seats for relevant packages.
- Upgrade readiness: Review upgrade capability state based on role and tenant configuration.
- Request history: Inspect pending and recent upgrade requests where available.
Upgrade Paths#
Upgrade flow options are capability-driven and may differ by workspace:
- Open Settings → Licensing.
- Review package candidates and select the target package.
- Follow the offered path for your role/account:
- Direct upgrade (when permitted)
- Checkout flow (when checkout is enabled)
- Invoice intent / approval flow (when consent/decision routing is required)
- Manager request path (when self-serve upgrade is restricted)
- Confirm and monitor status from Licensing activity/requests views.
Seat and Access Operations#
Operational controls around licensing are spread across Settings pages:
- Seat assignment: Assign/unassign users to licensed seats via Users/Licensing-integrated flows.
- Seat capacity: Add or remove seat capacity where your role and package allow it.
- Upgrade approvals: Approve/reject upgrade requests when you have required authority.
Data Lifecycle Controls#
Data retention and cleanup actions are handled across dedicated product surfaces.
Where to Manage Data Lifecycle#
Use the following locations for currently exposed data lifecycle operations:
- Retention policy: Configure recording/transcript/data retention in Settings → Security (Retention).
- Conversation cleanup: Delete conversations from conversation list/detail actions where your role permits it.
- User lifecycle: Archive users from Settings → Users when access should be removed.
- Audit exports: Export account audit logs from Settings → Audit Log when that feature is enabled.
Need Help?
Can't find what you're looking for in settings?